Duncan Brinsmead isn’t only smart…

He’s helpful too! If you don’t know who I’m talking about, Duncan Brinsmead is one of the scientists at Autodesk who is responsible for nCloth (together with Jos Stam, halleluja) paint effects and maya fluids. I’m guessing it’s pretty safe to say that this guy has a more than average IQ.

Anyway, he has a blog at “the area” where he often posts very useful tutorials and tips on how to use several features of nCloth and other maya unlimited features. Go Check it out!

grid deformer for maya

A few months back a german 3D artist by the name of Bernhard Haux amazed the XSI community with a type of Grid deformer. This deformer gave you the ability to sculpt your models by manipulating a grid in the camera view. It really was pretty amazing and it got me thinking about a way I could do it in maya. I’m not an API guy (yet) so I whipped up a script that gives you the ability to do the same thing as his plugin. Don’t get me wrong, his plugin is probably a lot more sturdy, but my way works good enough for me.

Anyway, have a look at what it can do.

Refinement Controllers that actually work :)

Wouldn’t it be cool if on top of your blendshapes or any other deformations, you could have additional clusters that allow you to sculpt the shape you want even further.
Doing that isn’t actually that hard, just make sure the cluster is the last deformer being evaluated and you’re pretty much set. The hard thing is having those deformers follow along with the already deformed mesh. I’ve been trying to find a way to do this for about a week now. I’ve tried several implementations that I got from several books, but none of them seemed to work for me (maybe i’m just a stupid ass that should learn to read fine print, …sue me). These methods often just allowed the cluster to follow a joint instead of the actual mesh it was deforming. Others just give you weird transformations errors or cycle errors…YUCKIE!

Anyway, here’s a new way that I worked out. It seems to work quite well and it doesn’t take a rocket scientist to set it up. (thank god, I’ve heard those guys are really expensive).

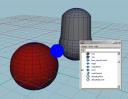
This is my test-setup, the almighty sphere!
We have 3 spheres here (I know, you only see 2, but that’s because 2 of them are lying on top of eachother. With good reason!)

1.jpg

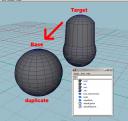
First of all, the “target” sphere represents any deformation you might apply to the base. Here this is just a simple blendshape going from the target to the base, but this can be anything (skinclusters, dynamics, etc…). Now let’s give a simple overview of how I’m gonna go about this.

I’m going to attach the clusters (the refinement controller) to the base. But I’m NOT going to let these deformers themselves deform the base, i’m going to have them deform another mesh. (WHAAAA???). Ok well here’s the deal, you can’t have a cluster follow the same vertices it is deforming, you’ll wind up in a cycle since the cluster is, in essence, trying to follow itself.
The way we work around this is by duplicating the base, and making a blendshape from the base to the duplicated mesh. (this blendshape will pass all the deformations on the base onto the duplicated mesh). By then having the clusters deform this duplicated mesh, we avoid the cycle since these clusters exist outside of the deformation graph on the base.
Maybe some graphics will clear things up.

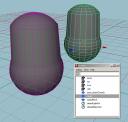
Basically, since we have a blendshape from the target to the base, activating the blendshape results in this.

2.jpg

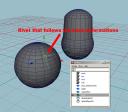
Now, we need to have something that follows the mesh. A rivet or a follicle will work wonders here. I’m gonna use the rivet since it’s easy and doesn’t require maya unlimited. (for those of you who don’t know rivet.mel is a script that creates a locator which follows all deformations on 2 edges.)

3.jpg

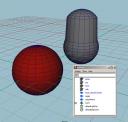
Okidoki, now we create a blendshape from the base to the duplicate of our base. This makes sure that the duplicate inherits all deformations from the base. I gave the duplicate a nice red color just for visual reference.

4.jpg

Now let’s create the refinement control. Select the verts you want deformed on the duplicate and create a cluster.

To get rid of the default “C” handle the cluster creates, create a nurbsSphere and make it the weighted node of the cluster (many texts describe this process, it’s just a matter inputting the .worldMatrix[0] of your control objects (nurbs sphere) into the .matrix attribute of your cluster node, and setting the “weighted node” attribute to be the name of the control object).
Also, make sure the “relative” checkbox on the cluster node is checked! This makes sure that the parent’s transformations aren’t accounted for in the cluster deformation.

I gave my control object a nice blue color.

5.jpg

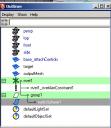
Make sure your cluster is at the top of the deformation stack.

6.jpg

Now just select the control Object, shift-select the rivet locator and hit P to parent your control under your rivet.

7.jpg

Voila! you can now just animate however you like (joints, blendshapes, other deformers.) and the cluster control will follow your animated mesh, making it easy and predictable for you to select and animate it to further hone your deformation.

bd_MELbatch up for download

I’ve decided to go ahead and release it. Anyone is invited to try it out and even use it for real stuff (omg!).

there’s a very small written manual at the top of the .mel file that I urge you to read before using it. I’ve used it a couple of times now and it works really well for me.

get it here

bugreports and suggestions are always welcome 🙂

UPDATE: 

I updated the file to a newer version of the script.   Kiaran ritchie suggested a way to do small batch commands without having to save and open a stackfile.  So I included an “instant batch mode” which let’s you input a small command and send it off directly for batching, without stackfiles.   I hope you like 🙂

Sneak peek at MEL batch!

The last couple of days I’ve been working on a new script called “bd_MELbatch”.  As the name might give away, it’s a tool for batching MEL commands.
Basically it let’s you input any type of command you would normally execute using MEL, and then executes it on any number of files of your choice.

For Example:

Imagine you have 15 shots of finished animation, and you’re in charge of connecting the dynamics onto the animation.  Normally, you’d have to go through all the 15 files and execute the commands for these steps one by one…taking up a lot of your precious time.

Enter bd_MELbatch.

 melbatch.jpg

Now you just write the MEL commands to hook up the dynamics, select the files you need to have it run on…execute the script, and DONE…all 15 files have been hooked up with dynamics!

I might release it to the community and maybe even do a demo video for it…but for now it’s still in beta and being tested.

Ratatouille animation test

hahahahahaaaaa…..

ahahahahahahaahahahah

This looks great and very promising

Rigging Endeavor: Part 3…deformation workflow and initial bind

I’ll start out with the deformation rig and how I set that up. As you can see from the model, it’s pretty lowRes. (see part 1). I’ll use that model which I exported from silo to skin the model to the joints. That gives me a decent idea ow how the model will deform, without giving me too much of a headache that I would normally get from a high density model.

After I finished skinning the lowres model to the joints, there are a number of things you can do.

1 – copy the skinweights from the lowres to the highres, and build your higher level deformations from the highres.
2 – create a duplicate of the lowres, smooth the duplicate. then have the lowres drive the highres duplicate through a blendshape.
3 – create a duplicate of the lowres, then connect the .outMesh attribute of the lowres to the .inMesh attribute of the highres. when that’s done, smooth the duplicate.

I’m gonna go with the third method, as it has proven a worthy solution in the past.
After the skinning is done, I then build my blendshape fixes from the highRes model, Since blendshapes are fast anyway (they only calculate the points that have been moved). + this way allows me to do deformation on whichever model I want actually. If one deformer fits best on the lowres, I can just put it on the lowres and the highRes will deform automatically :).

But for now, back to the skinning.

skinModel

As you can see in the screenshot, I chose to make an even simpler shirt for him. This is because I might want to do cloth simulation on his actual shirt instead of skinning it to joints. This simpler version of the shirt will make for a nice collision object.

Here’s a movie of how the initial binding looks,

as you can see, it’s pretty horrific. Especially the ribbons in the appendages look very bad, aswell as the stomic. I expected this kind of behaviour though. I might put an extra joint into his stomic to keep that mass intact while he bends forward, or I might just see where these initial joints take me. I can always add in extra joints later on.

It’s always good to do a range of motion test like I did with that video, You can actually use that animation to check how your weightpainting is affecting the mesh. While you’re working on the arm, just go to the part of the animation in which the arm moves, and you can see the results instantly.

Keep in mind that this part of the skinning is only for the main geometry. I’m not worrying about things like buttons, eyes, teeth, tongue or eyebrows yet. Those are things that are layered in later when I get the main geometry deforming like I want it to. Some stuff like buttons is actually going to be tacked onto the deforming geometry by using other higher-level deformers or constraints.

Rigging Endeavor: Part 2…Rig Layout and planning

Before I get into all the nitty gritty technical stuff…I might need to go ahead and explain how I normally construct my rigs.
Making a rig for production purposes is more than placing joints and putting IK handles where they should be. A good rig is fast, easy to use, and modular. A GREAT rig is modular, fast, easy to use AND doesn’t slow down your pipeline!

I hate the idea of having animators twiddle their thumbs while riggers are grinding their teeth on a rigging problem. Wouldn’t it be more productive if the animators could…I don’t know…animate? This is where the rig-structure i’m using comes in handy. For clarity’s sake, I didn’t invent this technique, it’s in use in several (I actually think most) production houses around the globe…

The trick is to place your joints inside the model, skin it, make it animatable and push it off for animation. That means ignoring any bad deformation or crashing geometry just yet. Just get it attached to some joints, rig it up and push it off!
Now that the animators have their animation rig to fiddle around with, you can concentrate on making the deformations look good. Then when the shot needs rendering, you take your finished deformation skeleton, hook it up to the animation rig that the animators have been working with and presto…their animation…on your rig.

There’s a couple of things that you need to keep in mind while working this way. For instance, corrective blendshapes. You need to drive your corrective blends with your deformation skeleton, not your animation skeleton…things like that.

So how does all this jibberish translate into some practical use? Well, you basically first layout the joints that will be deforming your rig…you then duplicate the jointhierarchy, this duplicate is your animation rig. You rig up all controllers and IK’s and whatnot to this animation rig, while leaving the deformation rig alone. As soon as the animation rig is done, it’s pushed off and you concentrate on the deformation…quick and easy. It also helps to have an autorigger, these are most of the time easy to write for animation rigs, not so much for deformationrigs.

If you then base all of your deformation issues off of your deformation skeleton, you can hook up any kind of animation to it and all the deformation will just….work.

I hope that made sense

Rigging Endeavor: Part 1…The beginning

Ok so I decided to rig up a character that’s been hanging around my harddrive for quite some time.  The reason for this is, I want to do some more animation in my free time, specifically acting shots, and I can’t find a rig that I like working with that has sufficient facial controls.
Don’t get me wrong, there are plenty of good rigs out there for free download, but I still like working with my own stuff… + it’s a good excuse to try out some tech stuff I’ve been cooking up in the back of my head.

Here’s the character… I modelled him in Nevercener silo (amazing modeling program, give it a try).  As you can see, i’m not much of a modeller, but I like doing it none the less, it’s relaxing :).


His name is George Peebler, he’s a single 38 year old 5th Grade elementary teacher at Lincoln High in pensylvania.    in his free time he likes to collect silverware, and he’s known online as luckySpoon68.
That’s his backstory just to give you an insight of who he is.   As you can tell, he’s the kind of guy you NEED to hang out with on a saturday night…never a dull moment.  I’ve started placing the joints that will be deforming him and also adding in ribbons (aaron holly ribbons) in his appendages, spine, and neck.  I’ll give a more detailed overview of this in one of the following posts.
And to that single person who is still reading this…thanks…you’re awesome!

Dr. Morris on Shortfall signals

A shortfall signal is one that fails to reach its usual level of intensity. In some ways, it falls short of the expected.

The On-Off smile is an obvious example. This is a smile that flashes quickly onto an otherwise immobile face and then, just as quickly, vanishes again. The normal smile, in contrast, takes fractionally longer to grow to full strength and to fade away again. Sometime, when friends meet in the street, they can still be seen smiling long after they have actually passed eachother. But the On-Off smile decays with lightning speed the moment the smiler’s face is no longer the focus of attention. Such smiles often last only a second and can be easily converted into insults by switching the smile on and then off while still in view”.

On a performer trying to fake a smile:

“To get it right he must copy all the elements of the smile to the appropriate degree. This means that he must stretch his lips, raise his mouth corners, and adjust the rest of his face, all to the correct strength in relation to one another, and for the correct length of time in relation to their intensity. Also the smile must grow on his face and fade away at the correct rate for the particular strength of expression”.

“If you watch foreigners that don’t go abroad very often, there is one noticable thing. When you watch these people as they engage in a conversation with their foreign-hosts, there is a curious phenomenon. Realizing that they have lost the subtle nuances of their home-town interactions. They avoid the danger of accidentally and unintended shortfall-signalling by employing a device that is both crude and effective….they over-exagerate EVERYTHING…”

Hehe, that last one’s funny cause it’s true! :).
Next up, Status displays!